Clearing Form Field Values

When using ProcFormEdit you may have noticed that there’s an option called OverwriteWithNull. ProcFields is designed to not change fields if not provided and a quirk of that design is that sending an empty string as the value fell into this case as well.

To maintain compatibility we left that behavior in place and introduced back in RPM 16 the OverwriteWithNull option to allow API users to explicitly indicate that they do in fact desire to make the Field’s value an empty string. This option introduced it’s own set of quirks which make it’s usage confusing. So here’s a quick guide for clearing the value of fields.

There are multiple ways to clear a field’s value.

First, OverwriteWithNull must be set to true, there is no way to clear a field’s value without that option set to true.

There are multiple ways to clear a field’s value. We recommend explicitly using the first method, but we are documenting all the other so that API users can prevent issues by inadvertently using one of the others:

Sending “Value": null

{
    "Field": "Text Field",
    "Uid": "500_2",
    "Format": 7,
    "Value": null
}

Sending "Value" : ""

{
    "Field": "Text Field",
    "Uid": "500_2",
    "Format": 7,
    "Value": ""
}

Sending Value: "null" (this is means there is no way to set a field’s value to “null”, unfortunately)

{
    "Field": "Text Field",
    "Uid": "500_2",
    "Format": 7,
    "Value": "null"
}

Not sending a Value at all (this is undefined in the JavaScript world)

{
    "Field": "Text Field",
    "Uid": "500_2",
    "Format": 7
}

Tagged with: , ,
Posted in API Usage Examples

Working with table fields via the API

Working with table fields via the API can be a bit confusing, we’ve written a guide to show the basics of table fields:

Working with Table Fields via the API

Posted in Uncategorized

An introduction to RPM Webhooks

We’ve published a quick introduction guide to RPM Webhooks in the upcoming RPM v12. If your organization is interested in automating some actions every time a form is created, edited, trashed/restored or archived/unarchived then take a look at thew new webhooks feature.

The guide can be found on the sidebar in most pages, for your convenience here’s a direct link too:

RPM Webhooks guide

Posted in Uncategorized

Worksheets being removed in RPM 11

In the next version of RPM we’re preparing a big change to a little used feature: Worksheets are being removed altogether from the service, including API access.

This means that the JSON structure for Forms is changing, and also the following API endpoints are being removed:

  • ProcFormWorksheetTableDataEdit
  • ProcFormWorksheetAdd
  • ProcFormWorksheetTableAdd
  • ProcFormWorksheet
Posted in Uncategorized

Getting more fields in ProcForms

The ProcForms API endpoint returns a list of forms for a given process. The fields returned for each form are based on the View ID provided. If the ViewID is not provided, the user’s default view is used.

Views in RPM

Views in RPM are used to show a list of forms in a process. The user has the freedom to select the visible fields and the order they’re in.

actions-view1

Clicking the “Edit view” button shows all the configurations possible in views, including the fields to show (highlighted in red):

actions-view2

Getting the View ID

RPM provides a section where it lists all the available views and the necessary IDs in ProcForms. To get to it go to the “Setup” section, click on the API button on the sidebar.

actions-view3

In the API page, there’s a “List of view IDs” link on the sidebar:

actions-view4

This page contains a list of all available views on a process. The user can select the process in the picker on the top left. Each row shown is one of the available views:

actions-view5

Using this information

With this information, the ProcForms endpoint can be called to provide the necessary data:

POST http://localhost/rpm/Api2.svc/ProcForms HTTP/1.1
RpmApiKey: 59a9a351-612d-4233-b610-134a7bca88b6

{
    "ProcessID": 1,
    "ViewID": 905
}

The response of this request looks something like this:

{
    "Result": {
        "Process": "Work Permits",
        "ProcessID": 1,
        "View": "Work information",
        "Columns": [
            "Number",
            "Start Date",
            "Short Description",
            "Complete Description"
        ],
        "Forms": [
            {
                "FormID": 3,
                "Values": [
                    "0003",
                    "3/4/2015 12:00:00 AM",
                    "Pipeline inspection in section C",
                    "Small leaks have been reported recently in section C pipelines, the works shall do a visual inspection to find any other leaks or rusted junctions and sections where new leaks could happen.\r\n\r\nAlso should look for any possible sources for these leaks (other than rusting)."
                ]
            },
            {
                "FormID": 2,
                "Values": [
                    "0002",
                    "3/6/2015 12:00:00 AM",
                    "Weekly Workshop Cleanup",
                    "Follow workshop cleanup checklist"
                ]
            },
            {
                "FormID": 1,
                "Values": [
                    "0001",
                    "3/19/2015 12:00:00 AM",
                    "Pump replacement at location ZZRP-1024",
                    "Replace the sump pump for the downstream reservoir"
                ]
            }
        ]
    }
}

Sending the same request without providing the ViewID will generate different results:

POST http://localhost/rpm/Api2.svc/ProcForms HTTP/1.1
host: localhost
RpmApiKey: 59a9a351-612d-4233-b610-134a7bca88b6

{
    "ProcessID": 1
}

In this case, the results contain the fields included in the user’s default view:

{
    "Result": {
        "Process": "Work Permits",
        "ProcessID": 1,
        "View": "All",
        "Columns": [
            "Number",
            "Owner",
            "Action due for me",
            "Started",
            "Started by",
            "Modified",
            "Modified by",
            "Files"
        ],
        "Forms": [
            {
                "FormID": 3,
                "Values": [
                    "0003",
                    "RPM Support",
                    "False",
                    "3/2/2015 2:47:41 PM",
                    "RPM Support",
                    "3/2/2015 2:47:41 PM",
                    "RPM Support",
                    ""
                ]
            },
            {
                "FormID": 2,
                "Values": [
                    "0002",
                    "RPM Support",
                    "False",
                    "3/2/2015 2:44:47 PM",
                    "RPM Support",
                    "3/2/2015 2:44:47 PM",
                    "RPM Support",
                    ""
                ]
            },
            {
                "FormID": 1,
                "Values": [
                    "0001",
                    "RPM Support",
                    "False",
                    "3/2/2015 2:43:46 PM",
                    "RPM Support",
                    "3/2/2015 2:43:46 PM",
                    "RPM Support",
                    ""
                ]
            }
        ]
    }
}
Posted in API Usage Examples

RPM 10 can now receive the API key as a request header

Back in 2013 we introduced a requirement that API keys had to be sent as the first attribute of the JSON payload, this was meant to allow some optimization when processing the request. This introduced a problem with JSON libraries that don’t allow custom property ordering. The JSON RFC also makes it clear that these keys are unordered.

Starting in RPM 10 we now check for the key in the header section of the HTTP request

Old:

POST http://localhost/rpm/Api2.svc/ProcFields HTTP/1.1

{
    "Key": ffffffff-ffff-ffff-ffff-ffffffffffff,
    "ProcessID": 502
} 

New:

POST http://localhost/rpm/Api2.svc/ProcFields HTTP/1.1
RpmApiKey: ffffffff-ffff-ffff-ffff-ffffffffffff

{
    "ProcessID": 502
}

For backwards compatibility we still allow the key to be passed as the first property in the JSON body. If a key is found in the header then any key in the body is ignored. Still, passing keys in the body should be considered temporary and we expect all API users to switch to the header key method. Eventually a future version of the API will no longer accept keys in the body.

Posted in API News, API Usage Examples

API primer: getting the coordinates of the options in a location list field

Location list fields are a special kind of list field where each option is associated to a set of geographic coordinate system coordinates.

When working with this kind of field via the API, the coordinates can be found inside the “InternalFormat” for the field and can be matched to the option via the ID.

Looking at the ProcFields response:

{
    "Result": {
        "Process": {
            "ProcessID": 502,
            "Fields": [
                {
                    "Name": "A Location List",
                    "Uid": "500_7610",
                    ...
                    "Options": [
                        {
                            "Text": "Headquarters",
                            "ID": 9386,
                            "IsHidden": false
                        },
                        {
                            "Text": "Field office",
                            "ID": 9387,
                            "IsHidden": false
                        }
                    ],
                    "InternalFormat": {
                        "Values": [
                            {
                                "Value": "51.0500\u00b0 N, 114.0667\u00b0 W",
                                "ID": 9386
                            },
                            {
                                "Value": "53.54438900,-113.49092669",
                                "ID": 9387
                            }
                        ]
                    },
                    ...
                }
            ],
            ...
        }
    }
}
Posted in API Usage Examples

Mastering ProcFormAdd and ProcFormEdit

A the core of the process management functionality in RPM is the ability to save and update the data contained in forms. This same power is available via ProcFormAdd and ProcFormEdit API endpoints.

Both endpoints use the same JSON structure that allows to store data in the available fields in a process. This article will show you how to format the data for each kind of field to be able to successfully add and edit their values.

For each type of fields we’ll show the format returned by ProcFields and then how to send the data to ProcFormAdd and ProcFormEdit.

Single select list fields

ProcFields

{
    "FormatType": 7,
    "IsRepeating": false,
    "IsRequiredForUser": false,
    "LayoutFormat": {
        "Order": -1,
        "Width": "1"
    },
    "Name": "single",
    "Options": [
        {
            "Text": "Option 1"
        },
        {
            "Text": "Option 2"
        },
        {
            "Text": "Option 3"
        }
    ],
    "SubType": 5,
    "Tuid": "500_7125305",
    "UserCanEdit": true
}

ProcFormAdd

The following request shows how to fill in a single select field while starting a new form:

POST http://localhost/rpm/Api2.svc/ProcFormAdd HTTP/1.1
host: localhost

{
    "Key": "7c2c1037-b6fd-4b0a-b403-9ed39062ad76",
    "ProcessID": 2818,
    "Form": {
        "Fields" : [
            {
               "Field": "single",
               "Value": "Option 1"
            }
        ]
    }
}

ProcFormEdit

When editing a form, you can use a request very similar to ProcFormAdd:

POST http://localhost/rpm/Api2.svc/ProcFormEdit HTTP/1.1
host: localhost

{
    "Key": "7c2c1037-b6fd-4b0a-b403-9ed39062ad76",
    "ProcessID": 2818,
    "Form": {
        "FormID" : 221594,
        "Fields" : [
            {
               "Field": "single",
               "Value": "Option 1"
            }
        ]
    }
}

Submitting an invalid option will leave the field without value so sending the correct value is important.


Note: the data sent for ProcFormAdd and ProcFormEdit are basically the same aside from ProcFormEdit requiring the FormID to identify which form to edit. The next sections will show only the ProcFormAdd to keep things short.


Multi select list fields

ProcFields

{
    "FormatType": 7,
    "IsRepeating": false,
    "IsRequiredForUser": false,
    "LayoutFormat": {
        "Order": -1,
        "Width": "1"
    },
    "Name": "multi select",
    "Options": [
        {
            "Text": "Option 1"
        },
        {
            "Text": "Option 2"
        },
        {
            "Text": "Option 3"
        }
    ],
    "SubType": 10,
    "Tuid": "500_7125310",
    "UserCanEdit": true
}

ProcFormAdd

The following request shows how to fill in a multi select field while starting a new form:

POST http://localhost/rpm/Api2.svc/ProcFormAdd HTTP/1.1
host: localhost

{
    "Key": "7c2c1037-b6fd-4b0a-b403-9ed39062ad76",
    "ProcessID": 2818,
    "Form": {
        "Fields" : [
            {
               "Field": "multi select",
               "Value": "Option 1, Option 2"
            }
        ]
    }
}

For multi select fields, send the options to “select” via a comma separated list.

Single value fields

We’re including in this section the following field types as they all behave similarly:

  • Text
  • Date
  • Date time
  • Money
  • Decimal
  • Quantity
  • Percent

For all these fields, the only difference is the formatting of the data to be sent. Here is the list of Fields as received from ProcFields:

ProcFields

"Fields": [
    {
        "FormatType": 7,
        "IsRepeating": false,
        "IsRequiredForUser": false,
        "LayoutFormat": {
            "Order": -1,
            "Width": "1"
        },
        "Name": "Text",
        "SubType": 1,
        "Tuid": "500_7125316",
        "UserCanEdit": true
    },
    {
        "FormatType": 7,
        "IsRepeating": false,
        "IsRequiredForUser": false,
        "LayoutFormat": {
            "Order": 2,
            "Width": "1"
        },
        "Name": "Text (paragraph)",
        "SubType": 11,
        "Tuid": "500_7125317",
        "UserCanEdit": true
    },
    {
        "FormatType": 7,
        "IsRepeating": false,
        "IsRequiredForUser": false,
        "LayoutFormat": {
            "Order": 3,
            "Width": "1"
        },
        "Name": "Text (Link)",
        "SubType": 12,
        "Tuid": "500_7125318",
        "UserCanEdit": true
    },
    {
        "FormatType": 3,
        "IsRepeating": false,
        "IsRequiredForUser": false,
        "LayoutFormat": {
            "Order": -1,
            "Width": "1"
        },
        "Name": "Date",
        "SubType": 3,
        "Tuid": "500_7125319",
        "UserCanEdit": true
    },
    {
        "FormatType": 27,
        "IsRepeating": false,
        "IsRequiredForUser": false,
        "LayoutFormat": {
            "Order": -1,
            "Width": "1"
        },
        "Name": "Date and time",
        "SubType": 28,
        "Tuid": "500_7125386",
        "UserCanEdit": true
    },
    {
        "FormatType": 2,
        "IsRepeating": false,
        "IsRequiredForUser": false,
        "LayoutFormat": {
            "Order": 6,
            "Width": "1"
        },
        "Name": "Money ($1,000.95)",
        "SubType": 7,
        "Tuid": "500_7125321",
        "UserCanEdit": true
    },
    {
        "FormatType": 26,
        "IsRepeating": false,
        "IsRequiredForUser": false,
        "LayoutFormat": {
            "Order": -1,
            "Width": "1"
        },
        "Name": "Money (1,000.9490)",
        "SubType": 16,
        "Tuid": "500_7125322",
        "UserCanEdit": true
    },
    {
        "FormatType": 29,
        "IsRepeating": false,
        "IsRequiredForUser": false,
        "LayoutFormat": {
            "Order": -1,
            "Width": "1"
        },
        "Name": "Decimal",
        "SubType": 22,
        "Tuid": "500_7125323",
        "UserCanEdit": true
    },
    {
        "FormatType": 20,
        "IsRepeating": false,
        "IsRequiredForUser": false,
        "LayoutFormat": {
            "Order": -1,
            "Width": "1"
        },
        "Name": "Quantity",
        "SubType": 14,
        "Tuid": "500_7125324",
        "UserCanEdit": true
    },
    {
        "FormatType": 21,
        "IsRepeating": false,
        "IsRequiredForUser": false,
        "LayoutFormat": {
            "Order": -1,
            "Width": "1"
        },
        "Name": "Percent",
        "SubType": 17,
        "Tuid": "500_7125325",
        "UserCanEdit": true
    }
]

ProcFormAdd

The following request shows how to fill each of the fields described before:

POST http://localhost/rpm/Api2.svc/ProcFormAdd HTTP/1.1
host: localhost

{
    "Key": "7c2c1037-b6fd-4b0a-b403-9ed39062ad76",
    "ProcessID": 2818,
    "Form": {
        "Fields" : [
            {
               "Field": "Text",
               "Value": "Anything can be put in this field, no length limitation"
            },
            {
               "Field": "Text (paragrahp)",
               "Value": "Anything can be put in this field, no length limitation"
            },
            {
               "Field": "Text (Link)",
               "Value": "http://google.ca"
            },
            {
               "Field": "Date",
               "Value": "2014-09-30"
            },
            {
               "Field": "Date and time",
               "Value": "2014-09-30T18:58"
            },
            {
               "Field": "Money ($1,000.95)",
               "Value": 129.3245
            },
            {
               "Field": "Money (1,000.9490)",
               "Value": 345.1234
            },
            {
               "Field": "Decimal",
               "Value": 123.321
            },
            {
               "Field": "Quantity",
               "Value": 4321.1234
            },
            {
               "Field": "Percent",
               "Value": 0.52
            }
        ]
    }
}


Some things to note:

  • Text fields – they all can be filled in with any string. Link fields (“SubType”: 12) don’t impose limitation on the data but it is recommended to submit a valir URL.
  • Date and Date and time fields – RPM expects dates in ISO 8601 format.
  • Decimal fields (money, decimal) – these fields all expect a decimal numeric value. They can receive as many decimal but will only show in RPM as configured (2 or 4 decimal).
  • Quantity – these fields expect whole numbers and will be left empty if not a whole number.
  • Percent – percentage fields expect percentage expressed as a decimal between 0 and 1 (use 0.95 to represent 95%). Numbers greater than 1 are allowed.

And that concludes this guide, in summary:

  • To be able to submit a request to ProcFormAdd or ProcFormEdit, it’s necessary to do a request to ProcFields to get a list of available fields.
  • The JSON format to add a new form and to edit a form are very similar.
  • The JSON format to set a value for a field is the same for every field type. What changes is the formatting of the data to be sent.
Posted in Uncategorized

Creating and editing forms that contain Yes/no lists fields using the API

On the previous part, we showed how yes/no lists are structured in the JSON sent by the RPM API. On this part, we’ll show how to add forms and edit the values in a yes/no lists field.

ProcFormAdd

The API endpoint to add a form to a process is ProcFormAdd, we’ll add a new form to the process created on the previous part:

POST http://localhost/rpm/Api2.svc/ProcFormAdd HTTP/1.1
host: localhost

{
    "Key": "7c2c1037-b6fd-4b0a-b403-9ed39062ad76",
    "ProcessID": "2781",
    "Form": {
        "Fields": [
            {
                "Field": "Yes/No List field",
                "Value": "{\"Values\":[{\"OptionID\":14321195,\"Value\":1,\"Comment\":\"Comment for this option\"},{\"OptionID\":14321196,\"Value\":2,\"Comment\":\"\"},{\"OptionID\":14321198,\"Value\":1,\"Comment\":\"\"}]}"
            }
        ]
    }
}

Note: The response from the request to ProcFormAdd will contain the internal FormID for the new form. This is useful if you need to be able to edit the form afterwards.

The field on the new form:
ProcFormAdd

ProcFormEdit

To edit a form, we use the ProcFormEdit API endpoint:

POST http://localhost/rpm/Api2.svc/ProcFormEdit HTTP/1.1
host: localhost

{
    "Key": "7c2c1037-b6fd-4b0a-b403-9ed39062ad76",
    "ProcessID": "2781",
    "Form": {
        "FormID": 221498,
        "Fields": [
            {
                "Field": "Yes/No List field",
                "Value": "{\"Values\":[{\"OptionID\":14321195,\"Value\":1,\"Comment\":\"Updated comment for this option\"},{\"OptionID\":14321196,\"Value\":1,\"Comment\":\"\"},{\"OptionID\":14321198,\"Value\":2,\"Comment\":\"\"}]}"
            }
        ]
    }
}

The field on the updated form:
ProcFormEdit

Posted in API Usage Examples

Reading Yes/no lists fields via the API

The following guide will introduce some of the details you need to take into consideration when interacting with yes/no lists via the RPM API.

Process Template

When setting up a yes/no list field, you can configure it in different ways:

example01 - 01-setup

  1. Value column labels determines the text to display for the yes and no answers
  2. Value column order determines which answer shows up first
  3. Value column format determines if the yes/no list should use check boxes instead of radio buttons
  4. Text value position determines if the option text shows before or between the yes and no answers
  5. Null column allows to enable and determine the display text for a “not applicable” answer
  6. Comments column allows to enable and determine the display text for a “comments” free-text answer

This guide will show a process template with a yes/no field setup with the options shown in the previous image.

Displaying a yes/no list field

When displaying an entire form, any of the fields could be a yes/no list. This section shows how to retrieve the data and how to interpret the data related to a yes/no list field.

The ProcFields API endpoint returns the setup information for a process. The following is an example based on a process setup with only one yes/no list field (as seen on the previous screenshot).

Sending the ProcFields request

Sending the request to the API:

POST http://localhost/rpm/Api2.svc/ProcFields HTTP/1.1
host: localhost

{
    "Key": "7c2c1037-b6fd-4b0a-b403-9ed39062ad76",
    "ProcessID": "2781"
}

The response will look something like this:

{
    "Result": {
        "Process": {
            "FieldGroups": [],
            "Fields": [
                {
                    "FormatType": 47,
                    "InternalFormat": {
                        "HideNull": false,
                        "LabelComment": "Leave a comment",
                        "LabelNo": "Nope",
                        "LabelNull": "Maybe",
                        "LabelYes": "Yep",
                        "Options": [
                            {
                                "OptionID": 14321195,
                                "Text": "Option 1"
                            },
                            {
                                "OptionID": 14321196,
                                "Text": "Option 2"
                            },
                            {
                                "OptionID": 14321197,
                                "Text": "Call me"
                            },
                            {
                                "OptionID": 14321198,
                                "Text": "Option 3"
                            }
                        ],
                        "OrderSwap": false,
                        "RenderCheckbox": true,
                        "ShowComment": true,
                        "TextMiddle": true,
                        "TwoTables": false
                    },
                    "IsRepeating": false,
                    "IsRequiredForUser": false,
                    "LayoutFormat": {
                        "Order": 1,
                        "Width": "2"
                    },
                    "Name": "Yes/No List field",
                    "SubType": 41,
                    "Tuid": "500_7123449",
                    "UserCanEdit": true
                },
                {
                    "FormatType": 7,
                    "IsRepeating": false,
                    "IsRequiredForUser": false,
                    "LayoutFormat": {
                        "Order": -1,
                        "Width": "1"
                    },
                    "Name": "multi list",
                    "SubType": 10,
                    "Tuid": "500_7123652",
                    "UserCanEdit": true
                }
            ],
            "ProcessID": 2781
        }
    }
}

The ProcFields response

Looking at the “Fields” list in the response, notice that there’s only one field Named “Yes/No List field” whose “FormatType” is 47 (YesNoList). One attribute we are interested in is the “InternalFormat”:

"InternalFormat": {
    "HideNull": false,
    "LabelComment": "Leave a comment",
    "LabelNo": "Nope",
    "LabelNull": "Maybe",
    "LabelYes": "Yep",
    "Options": [
        {
            "OptionID": 14321195,
            "Text": "Option 1"
        },
        {
            "OptionID": 14321196,
            "Text": "Option 2"
        },
        {
            "OptionID": 14321197,
            "Text": "Call me"
        },
        {
            "OptionID": 14321198,
            "Text": "Option 3"
        }
    ],
    "OrderSwap": false,
    "RenderCheckbox": true,
    "ShowComment": true,
    "TextMiddle": true,
    "TwoTables": false
}

Looking at the parsed Internal format you can see the same properties that we setup at the beginning but presented in a JSON format:

  1. Value column labels “LabelYes” and “LabelNo”
  2. Value column order “OrderSwap” (true means Yes/No, false No/Yes)
  3. Value column format “RenderCheckbox”
  4. Text value position “TextMiddle”
  5. Null column “LabelNull” and “HideNull”
  6. Comments column “LabelComment” and “ShowComment”

The options to display in the list are available via the “Options” list.

Retrieving form data

The ProcForm API endpoint, provides the data stored in one form.

Sending the ProcForm request

POST http://localhost/rpm/Api2.svc/ProcForm HTTP/1.1
host: localhost

{
    "Key": "7c2c1037-b6fd-4b0a-b403-9ed39062ad76",
    "FormID": 221421
}

The response will look something like this:

{
    "Result": {
        "Form": {
            "Actions": [],
            "ApprovalResult": "",
            "Fields": [
                {
                    "Field": "Yes/No List field",
                    "Value": "{\"Values\":[{\"OptionID\":14321195,\"Value\":2,\"Comment\":\"\"},{\"OptionID\":14321196,\"Value\":1,\"Comment\":\"\"},{\"OptionID\":14321198,\"Value\":2,\"Comment\":\"\"}]}"
                }
            ],
            "Files": [],
            "FormID": 221421,
            "Modified": "2014-09-22",
            "Notes": [],
            "NotesForStaff": [],
            "Number": "0003",
            "Owner": "joaquin manager",
            "Participants": [
                {
                    "Name": "joaquin manager",
                    "Read": "2014-09-18",
                    "Role": "System Manager"
                }
            ],
            "Sets": [],
            "Started": "2014-09-17",
            "Status": "New",
            "VerifiedList": []
        },
        "Process": "18209 - yes/no example",
        "ProcessID": 2781
    }
}

The ProcForm response

Looking at the “Fields” list in the response, the “Value” of the “Yes/No List field” will be a string-encoded JSON that contains the value for each option where the user chose something other than the Null option, after decoding the data it looks like this:

"Fields": [
    {
        "Values": [
            {
                "Comment": "",
                "OptionID": 14321551,
                "Value": 2
            },
            {
                "Comment": "",
                "OptionID": 14321552,
                "Value": 1
            },
            {
                "Comment": "",
                "OptionID": 14321554,
                "Value": 2
            }
        ]
    }
]

Each option contains a “Value” key that indicates which value was chosen:

  • 1 means the user chose the “No” option
  • 2 means the user chose the “Yes” option

Use the “OptionID” key to match with the option text available via the ProcFields API call.

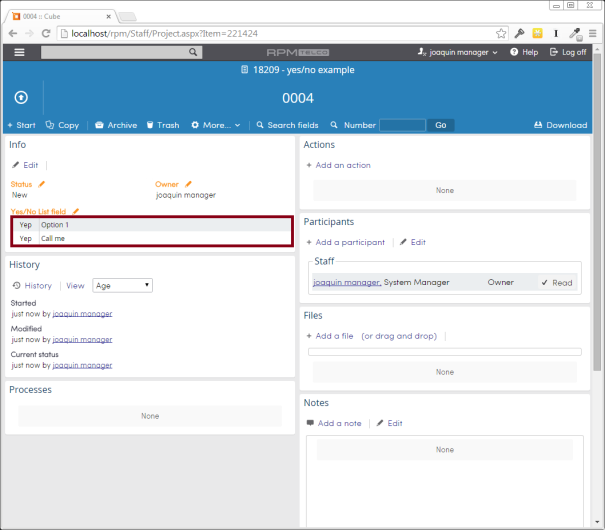
This is the basic information necessary to display a yes/no list field. Inside RPM they are displayed in the following way:

Editing
example01 - 06-form-edit

Displaying
example01 - 06-form

Notice that options that have the “N/A” option selected (in this example “Maybe”) are not shown on the view.

And that is the basics of how to interpret and handle the data received via the API:

  • Use ProcFields to get the setup information on how to display a yes/no list fields
  • Use ProcForm to get the actual data in the field when displaying a form

Other yes/no list configurations

Checkboxes

When the a yes/no list is setup to use checkboxes the Null option must be ignored as it’s not possible for the user to respond “not applicable”.

example02 - 01-setup-checkboxes

Note how the “Null column” section on the setup page has disappeared. In the response for ProcFields:

"InternalFormat": {
    "HideNull": false,
    "LabelComment": "Comments",
    "LabelNo": "Nope",
    "LabelNull": "Maybe",
    "LabelYes": "Yep",
    "Options": [ ... ],
    "OrderSwap": false,
    "RenderCheckbox": true,
    "ShowComment": false,
    "TextMiddle": true,
    "TwoTables": false
}

Notice that “HideNull” is still false, but “RenderCheckbox” is now true.

Inside RPM they are displayed in the following way:

Editing
example02 - 02-form-edit

Displaying
example02 - 03-form-display

Comment fields

Yes/no lists can be configured to show a comment field for every option available. Modifying the previous example, the setup setup section will look like the following:

example03 - 03-setup-comments

After enabling the comments field option, the “InternalFormat” in the response for ProcField looks like:

"InternalFormat": {
    "HideNull": false,
    "LabelComment": "Leave a comment",
    "LabelNo": "Nope",
    "LabelNull": "Maybe",
    "LabelYes": "Yep",
    "Options": [ ... ],
    "OrderSwap": false,
    "RenderCheckbox": true,
    "ShowComment": true,
    "TextMiddle": true,
    "TwoTables": false
}

Notice that “ShowComment” now is true and “LabelComment” indicates the text to put as a label.

Inside RPM they are displayed in the following way:

Editing
example03 - 02-form-edit

Displaying
example03 - 03-form-display

On the next article, we show how to add and edit forms that contain one of these yes/no list fields via the API.

Posted in API Usage Examples